
Welcome to the realm of QuickBooks, where the robust arsenal of features includes a gem known as the QuickBooks Conversion Tool. If you’re a seasoned QuickBooks user, the chances are that you’ve come across this tool that plays a pivotal role in converting company files from one program to another. Among the array of tools and functionalities embedded in QuickBooks Desktop, the conversion tool stands out as a powerhouse, facilitating seamless transitions across various programs.
This tool empowers users to perform intricate maneuvers, such as converting from QuickBooks 2017 to QuickBooks Desktop Premier, QuickBooks Desktop Premier 2018, Pro 2018, or QuickBooks Desktop Enterprise Solutions 18.0. Despite its complexity, the QuickBooks conversion tool boasts a remarkable trait – it completes the conversion process with utmost precision, ensuring that your data security remains uncompromised throughout.
In essence, the QuickBooks conversion tool acts as your trusted companion, ensuring a smooth journey as you convert company files between different programs. It’s a tool that stands firm on the principles of efficiency and data security. If delving into the intricacies of using the QuickBooks Desktop Conversion Tool intrigues you, buckle up and read this post attentively till the very end. We’re about to unravel the steps and insights you need for a seamless conversion experience.
QuickBooks Conversion Tool: Explained
Within the expansive landscape of QuickBooks Desktop lies a treasure trove of features and tools, and among them shines the QuickBooks Data Conversion Tool. This remarkable tool opens the door to a world of possibilities, allowing users to seamlessly convert company files from a myriad of different programs. What sets this tool apart is its ability to effortlessly handle conversion tasks of varying complexities, all while maintaining the utmost data security.
The QuickBooks Data Conversion Tool is your go-to ally, ensuring a smooth conversion experience without compromising the integrity of your data. Whether it’s converting from QuickBooks 2017 to QuickBooks Desktop Premier 2018, Pro 2018, or even QuickBooks Desktop Enterprise Solutions 18.0, this tool simplifies the process and delivers results you can trust. Join us as we explore the depths of this powerful tool and uncover the steps to harness its capabilities for seamless data conversions.
Conversion Capabilities: What QuickBooks Conversion Tool Can and Cannot Convert
What QuickBooks Conversion Tool Can Convert:
- Lists of Accounts, Employees, Items, Customers, and Vendors.
- Account Balances.
- Customer and Vendor Transactions.
- Employee Profiles and Contact Information.
- Payroll General Ledger Account Balances.
- Paychecks (Converted into Journal Entries).
What QuickBooks Conversion Tool Cannot Convert:
- Payroll Transactions and Employee Year-to-Date Information (including paychecks and year-to-date adjustments).
- Work Tickets.
- Fixed Assets.
- Individual Employee Wage or Deduction Information.
- Closed or Partially Closed Sales Orders, Purchase Orders, and Estimates.
It’s essential to note that the conversion is limited to versions of Sage 50 and QuickBooks Desktop within the same region. If you’re working with the US version of Sage 50, ensure that you convert it to the corresponding US version of QuickBooks Desktop for a seamless transition. Join us as we delve into the intricacies of what QuickBooks Conversion Tool can accomplish and the nuances of what lies beyond its conversion capabilities.
Benefits of QuickBooks Desktop Conversion Tool
Exploring the Prowess of QB Conversion Tool Features:
1. Streamlined Setup Process:
The QB Conversion Tool streamlines the setup process, making QuickBooks file conversion a seamless endeavor.
2. Data Preservation:
One notable advantage is the tool’s ability to preserve current/existing data files during the conversion process.
3. Insight into Business State:
Gain valuable insights into the current state of your business with the assistance of this powerful tool.
4. Data Import from New QuickBooks Company:
The tool effortlessly imports data from the new QuickBooks company, ensuring a smooth transition.
5. Log Creation for Systematic Records:
Each conversion is documented with precision as the tool generates a log, maintaining systematic records for future reference.
6. Flexible Import Choices:
Enjoy flexibility with import choices, allowing you to list plus/minus balances and historical transactions in a single go.
7. Robust Data Security Assurance:
With a commitment to data security, the tool ensures that the conversion process takes place without compromising the integrity of your data.
Navigating System Requirements for the QuickBooks Conversion Tool
Ensuring Compatibility for a Seamless Conversion Experience
1. Operating System Compatibility:
Ensure your system runs on Windows 10, Windows 8.1, or Windows 8, meeting the essential prerequisites for the QuickBooks conversion tool.
2. Processor Requirement:
A minimum processor speed of 500 MHz Intel Pentium II is necessary for optimal tool performance.
3. Memory Specification:
Allocate at least 512 MB to meet the memory requirements for a smooth conversion process.
4. Hard Drive Space:
Make available 2.5 GB of free space on your hard drive to accommodate the conversion tool and related processes.
5. Microsoft .NET Framework:
Ensure your system has at least Version 2.0 of the Microsoft .NET framework installed, a fundamental component for tool functionality.
6. QuickBooks Desktop Compatibility:
The QuickBooks Desktop version should be Pro, Premier, or Enterprise 2018 for seamless integration with the conversion tool.
7. Sage 50 Compatibility:
If you’re using Sage 50, ensure your version is 2013 or later to maintain compatibility with the QuickBooks conversion tool.
8. Operating System Variation:
Note that the supported operating systems include Windows 7, 8, or 10, as well as Windows Vista and Windows XP.
9. QuickBooks Desktop Installation and Registration:
Ensure QuickBooks Desktop is installed correctly and registered to guarantee a seamless conversion process.
10. RAM Storage Specification:
Maintain a RAM storage of 512 MB or higher to meet the tool’s memory requirements effectively.
Navigating the QuickBooks Conversion Tool Download Process
Unlocking the Quick Steps to Acquire the Conversion Tool
1. Downloading the QuickBooks Conversion Tool:
Begin by downloading the QB Conversion Tool from the designated source.
2. Locating the Downloaded File:
Find and open the folder containing the downloaded file to initiate the installation process.
3. Configuring Tool Properties:
Right-click on the QuickBooks Conversion Tool icon and select “Properties.”
4. Compatibility Mode Setup:
Under the compatibility mode, check the “Run this program in compatibility mode for” box. Choose the appropriate Windows operating system from the dropdown menu.
5. Confirming Settings:
Click “OK” to confirm the compatibility settings.
6. Running as Administrator:
Right-click on the file, specifically QuickBooksConversionToolSetup.exe, and select “Run as Administrator” to initiate the tool setup.
How to Use QuickBooks Conversion Tool?
1. Launching the Tool:
Begin by double-clicking on the Conversion Tool to open it, signaling the start of your QuickBooks conversion journey.
2. Choosing Company Type:
Select one of the two options presented on the screen: “My Client Company” or “My Own Company.”
3. Selecting Accounting Software:
Follow the prompts to choose the accounting software relevant to your conversion process.
4. Choosing Company File:
Opt for the company file by selecting “Next” and proceed to the next step.
5. Selecting QuickBooks Product:
Choose the specific QuickBooks product and navigate to the folder where your company file is stored. Click “Next” to move forward.
6. Setting Conversion Levels:
Select the appropriate conversion levels from the displayed list and proceed to the next stage by clicking “Next.”
7. Accounting Preferences:
Customize accounting preferences based on the date and name of the company. Click “Next” to move to the next step.
8. Final Checks:
Thoroughly review all the details before initiating the conversion. Once satisfied, click “Start” to commence the conversion process.
9. Completion and Finish:
After the conversion process is complete, click “Finish” to wrap up the QuickBooks conversion journey.
How to Migrate from Sage 50 to QuickBooks Desktop?
Embarking on the Sage to QuickBooks Desktop Conversion Journey:
Step 1: Setting Up Data Access Credentials in Sage
1. Launch the Sage application and open the company file.
2. Navigate to the Main menu, select Maintenance, go to Users, and choose the Setup Security tab.
3. Set up data access credentials and click on Data Access/Crystal Reports.
4. Click on “Change” to set the password, then close Sage.
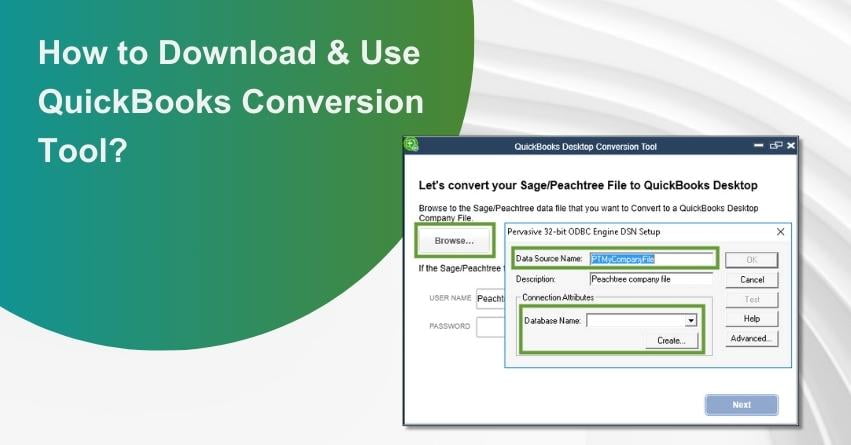
Step 2: Selecting the Sage Company File and Running QuickBooks Conversion Tool
1. Download and install the QuickBooks Conversion Tool from the Intuit website.
2. Run the tool as an administrator by right-clicking on QuickBooksConversionToolSetup.exe and choosing “Run as admin.”
3. Click “Browse” to select the company file from the database name window.
4. Choose the Company name and click “OK.”
Step 3: Converting the Company File
1. Select the QuickBooks version for conversion and specify the folder for the QuickBooks file. Click “Next.”
2. In the new window, verify the accuracy of the information and click “Convert File.”
3. Wait for the completion message and open the QuickBooks file to ensure successful conversion.
Step 4: Reviewing the Conversion
1. After the tool completes the task, choose to open in QuickBooks.
2. Review the data in QuickBooks to ensure everything is present.
3. Examine the transfer log in C:\USERS\[Your Windows User Name]\My Documents\Intuit\QuickBooks to check for failed transactions.
Important Note:
Ensure Sage 50 and QuickBooks Desktop versions are from the same region for successful conversion.
If using the US version of Sage 50, convert it to the corresponding US version of QuickBooks Desktop.
Embark on this comprehensive guide to navigate each step of the QuickBooks Desktop Conversion process, ensuring a seamless transition of your company files.
How to Convert from Quicken to QuickBooks Desktop?
Unlocking the Seamless Transition for Quicken 2011 or Earlier Versions:
1. Download the QuickBooks Conversion Tool:
Begin by downloading the QuickBooks conversion tool. Note that if you are transitioning to QuickBooks of the same year from Quicken of the same year, the tool may not be necessary. It’s particularly effective when QuickBooks is newer than Quicken.
2. Launch the Quicken Converter:
Open the Quicken converter and click on the “Next” tab.
3. Accept License Agreement:
Accept the terms in the license agreement and proceed by clicking on “Next” and “Install” options.
4. Launch Quicken Converter:
Choose to launch the Quicken converter and click on the “Finish” tab.
5. Start Data Transfer:
Opt for “I am transferring data from Quicken to Windows” and select “Get Started.”
6. Open Data File:
Select “Open a data file located on this system” and browse the file by clicking on “Select File.” Click on “Convert” and then “OK.”
7. Save the Updated Quicken File:
Save the updated Quicken file by clicking on “Save” and choose the “Exit” option. Note that the Quicken file will now be upgraded.
8. Launch QuickBooks Desktop:
Open QuickBooks desktop to proceed with the conversion.
9. Navigate to File and Utilities:
Move to the “File” and “Utilities” tab, and select “Convert” and then “From Quicken.”
10. Follow Onscreen Prompts:
Complete the process by following the onscreen prompts to ensure a smooth transition.
Limitations of the QuickBooks Conversion Tool
While the QB conversion tool boasts noteworthy features, it’s essential to be aware of its limitations. These constraints primarily revolve around the importation of data, transactions, and account balances from alternative financial software into QuickBooks. Understanding these limitations is crucial, especially when dealing with specific details like employee list information, including social security numbers, and payroll general ledger account balance details.
Certain payroll information remains beyond the reach of the QuickBooks conversion tool. This includes aspects such as paychecks, employee year-to-date information, payroll items, individual employee wages, and more. Additionally, functionalities like job costing, fixed asset items, work tickets, and the handling of closed or partially closed sales orders, estimates, and purchase orders may not be seamlessly converted using this tool. It’s essential to recognize these limitations to ensure a comprehensive understanding of the tool’s capabilities and plan accordingly for any non-convertible elements.
Conclusion
As we bring this article to a close, we hope the information provided above proves helpful in navigating the intricacies of the QuickBooks Desktop Conversion Tool. Should you have any queries or require additional information, feel free to reach out to our dedicated QuickBooks assistance team through our toll-free helpline at +1-888-245-6075.
Frequently Asked Questions (FAQs)
To download the QuickBooks Conversion Tool, visit the official QuickBooks website or the designated download page. Follow the prompts to download and install the tool on your system.
The compatibility of the QuickBooks Conversion Tool may vary. Ensure you download the version that aligns with your specific QuickBooks Desktop version for optimal performance.
The QuickBooks Conversion Tool can convert various data, including account lists, balances, customer and vendor transactions, employee profiles, and more. However, there are limitations, such as certain payroll information and specific transactions.
Yes, there are specific steps outlined for using the QuickBooks Conversion Tool. These include downloading the tool, launching the conversion process, and following onscreen prompts. A detailed guide is typically provided by QuickBooks.
If you encounter any issues during the download or conversion process, consider reaching out to us. You can contact our support team through the dedicated helpline at +1-888-245-6075 for immediate assistance and resolution of any issues.
